Where fellow Yzmir heroes Akesha & Taru pass priority with an explicit after-you, Lindiwe & Maw exemplify the Yzmir ethos in different way: Lindiwe plays out her turn, then only once her opponent has revealed their hand does she sacrifice characters to juggle stats around such that she comes out ahead.
The deck
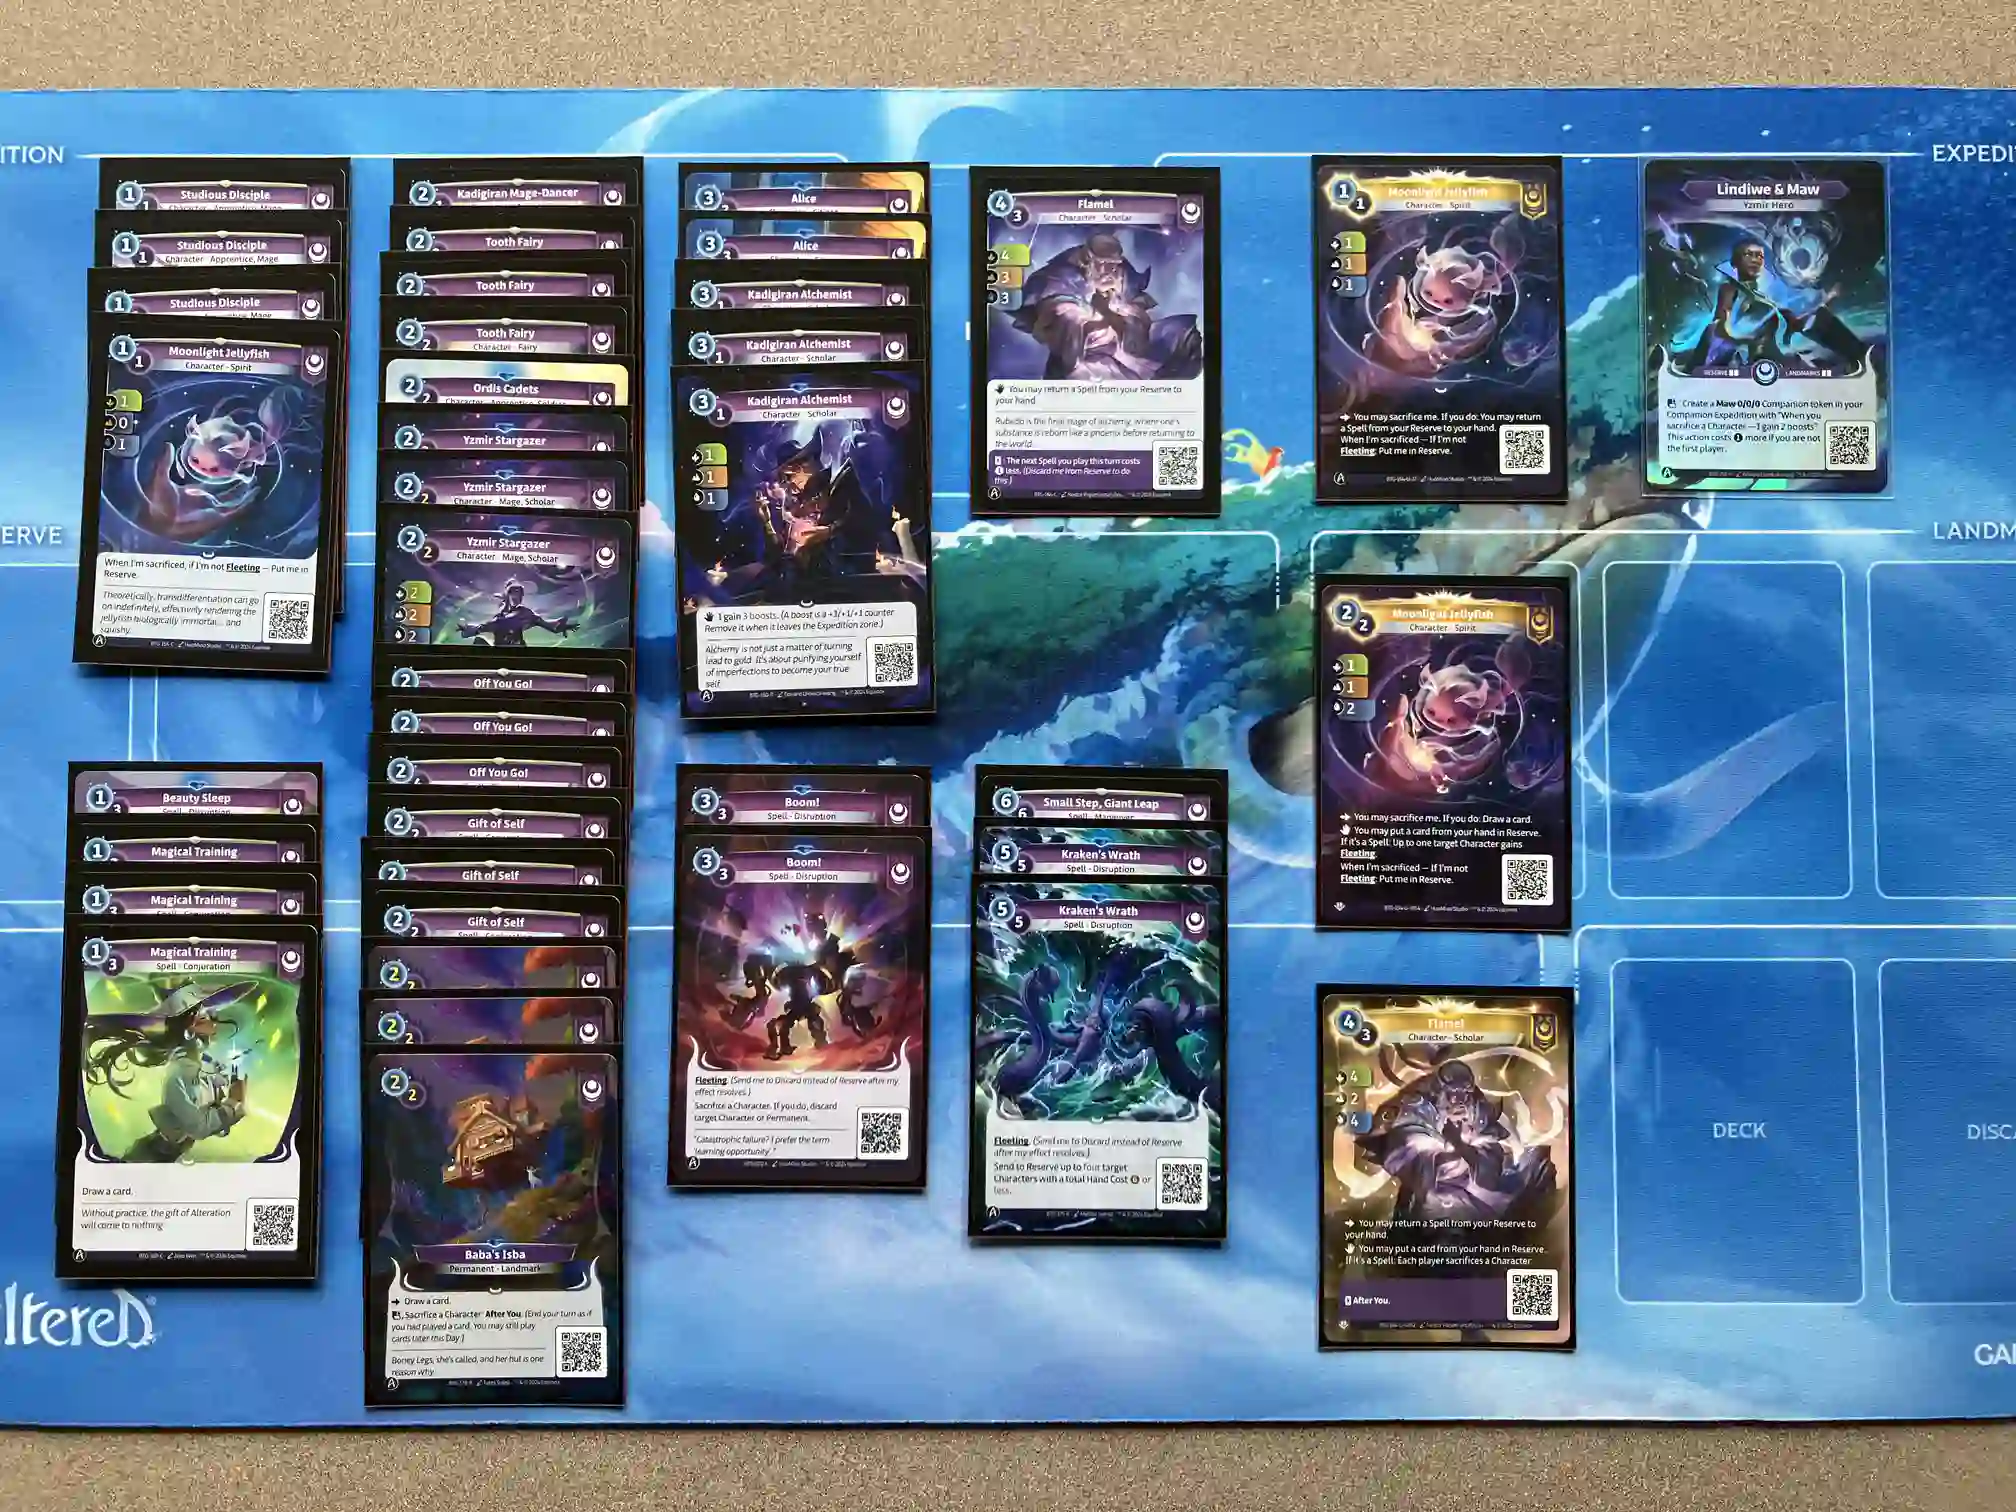
While you could arguably build a stronger deck by importing the strongest sacrifice cards into a standard Yzmir control shell, I’ve gone the route of building around Baba’s Isba (R). It provides you with an explicit after-you in addition to the implicit after-you of shifting around stats, letting you get the most out of your removal spells, including the 5-mana Kraken’s Wrath (R).
Typically, I try to trade through the early-game, find a window to sneak out a Baba’s Isba without falling behind, then close the game out with multi-sacrifice Maws backed by after-you’d removal spells.
Cheap, sacrificeable characters are important to fuel your Isbas and Boom! (F)s but sometimes struggle when you just need to commit stats to an expedition. As a result, I’ve found it important to include a healthy amount of well-statted 3-drops like Kadigiran Alchemist and Alice.
Lindiwe has no shortage of card draw thanks to Gift of Self (C) and Magical Training (C). While this allows you to include more cheap characters, utilize support abilities, and focus less on spell recursion, you should still do your best to avoid sacrificing non-token characters that aren’t fleeting unless doing so offers you a major advantage.
Uniques

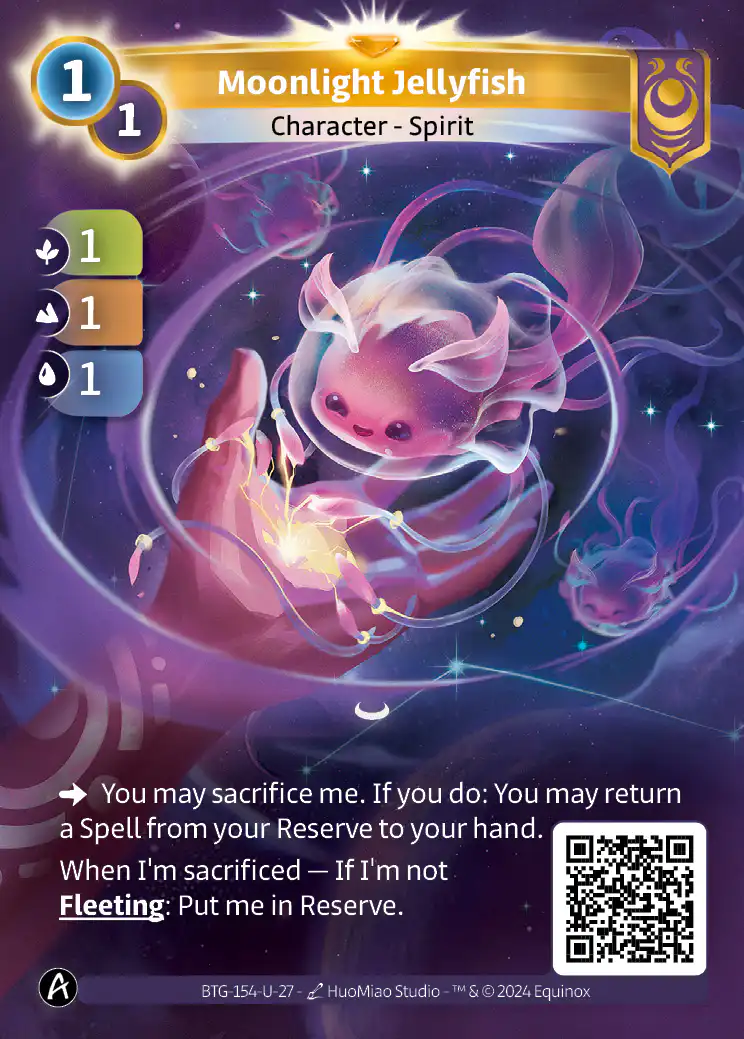
Moonlight Jellyfish: 6/7
For the low cost of 1 mana, this Moonlight Jellyfish can return a Magical Training (C), Off You Go! (C), or Beauty Sleep (F) to hand while giving Maw +2/2/2. It can be played twice on the same turn, so even if you don’t have a spell in reserve, you’re happy spending 2 mana for a 4/4/4 Maw. Even the 1/1/1 in stats matters; I’ve been in a surprising number of situations where I just needed to run this out to contest the hero side.
It’s definitely a downside that this unique can’t loop with other Jellyfish that return another card from hand on sacrifice, but aside from those situations, you’ll usually be wanting to return a spell from reserve anyway.

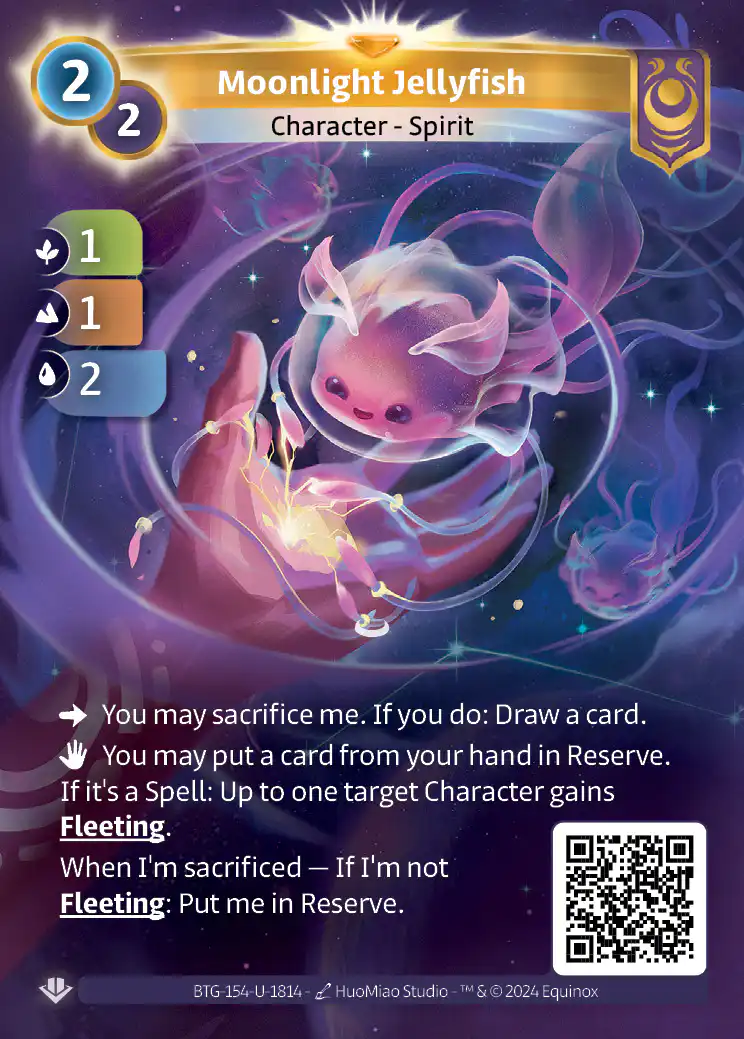
Moonlight Jellyfish: 5/7
For Lindiwe, you’re spending 2 mana to draw a card and boost Maw by +2/2/2, sort of like a mini Physical Training (R), a card that gets much better when you shave off a mana. It compares favorably even to Baba Yaga (R), costing 1 less, drawing as an arrow ability, and being able to be played twice on the same turn.
This one is strong even without the from-hand ability, but there are situations where you’ll have a fleeting spell like Gift of Self (C) or Boom! (F) in hand, or where giving something fleeting is worth discarding a spell.

Flamel: 4/7
This Flamel is already an upgrade over the common since it returns a spell as an arrow ability, not just from hand.
What makes this one cool is its alternate mode as a 4-mana Anubis from hand that’s optional to trigger. If the sacrifice is advantageous for you, you can (1) put a spell from hand into reserve, then immediately return it to hand or (2) return a spell from reserve to hand, then immediately put it back. For Lindiwe, Gift of Self (C) and Boom! (F) are both spells that have no downside of being put into reserve, so you can also trigger the sacrifice by swapping them with a spell that is better from hand.
Card choices
Cards included
- Baba’s Isba (R): The rare costing 2 mana means there are so many more situations where you can safely play this out, sometimes even on T1.
- Yzmir Stargazer (R): This card’s stats already make it a serviceable standalone 2-drop for a faction that has few. It’s very powerful to be able to play it out as an after-you and only sacrifice it to Isba at the end of a turn once you know how you really want to distribute your stats.
- Moonlight Jellyfish (C): Lindiwe really likes 1-drops, especially in an Isba build. Not being able to run three copies is a significant downside of unique Jellyfish. I prefer the common because rare slots are tight, and Lindiwe already has card draw covered.
- Kadigiran Alchemist: This is perfect for Lindiwe as an average common or well-statted rare 3-drop that can trade early while also providing a 1-drop to sacrifice on the back-end. The rare’s bump in stats matters, but the common is already so nice.
- Alice (R): Another well-statted 3-drop. Her after-you support ability can open up windows for a Kraken’s Wrath or help Maw dodge removal.
- Boom! (F): A very powerful and synergistic removal spell. I’ve been liking two copies rather than three since it can be mana-hungry if you’re not the first player, and you’re sometimes overloaded on sacrifice outlets with three copies of Baba’s Isba.
- Tooth Fairy (C): The rare would be valuable as 1-mana sacrifice-fodder from reserve, but I feel like the common is a bigger upgrade over other commons than the rare is compared over its alternatives. I’m happy with the common even when I play it for its sabotage, then immediately sacrifice it before it hits reserve.
- Ordis Cadets (F): This is the fifteenth rare, but I like that the Ordis Recruit is great sacrifice fodder, and the cost-reduction support ability can open up some powerful turns.
- Kraken’s Wrath (R): The rare’s extra reach is often critical. Hitting a fourth character is a meaningful upgrade over the common in the Ordis matchup.
- Small Step, Giant Leap (C): I tend to run fewer of these than most people at a baseline. I do think I have more of a justification here: if you just need something to play now, copies of these are whiffs off of Gift of Self (C) or Magical Training (C) when the deck already has three in the form of Baba’s Isba (R).
Cards excluded
- Ordis Carrier (F): I was running two copies until recently. While Carrier + Isba combines the strengths of Kojo and Akesha, I found myself losing too much tempo getting this down. The Carrier’s role can be replaced by low cost characters which have the additional benefit of passing priority.
- Baba Yaga: This isn’t as compelling for Lindiwe, who has plenty of card draw thanks to Gift of Self (C). Baba Yaga provides a reasonable body with some card draw, whereas Lindiwe would prefer either a large body to counteract her low-tempo plays or a small body to sacrifice.
- Kuwat, the Dissenter (C): I included this for a while but often found myself putting it into mana. It usually ended up being a mid/late-game play that would result in a trade, which isn’t great if Lindiwe is behind (and she often is).
Takeaways
Character placement matters a lot more in games with or against Lindiwe. If you’re the Lindiwe player, you prefer to play characters hero-side; if your opponent fights you there, you can sacrifice them to boost Maw companion-side. If you’re against the Lindiwe player, be careful not to place characters companion-side if Lindiwe is representing ways to overtake them with Maw (see R3).
Be conscious of when you’re the starting player. In the early turns - and on T2 in particular - the 1 mana to create Maw is often the difference between a sacrifice line being possible or not, so plan your opening hand accordingly. For example, Gift of Self (C) is a much more reasonable T2 play if Maw is free.
The games
Round 1 (W): Kojo & Booda
Alice (F) was strong enough to go 1-1 as the first player against Sun Wukong (R). Spending Alice’s support ability as the second player forced my opponent to commit before I played a single card, which gave me the freedom to play a Kadigiran Alchemist (C) against their weaker side, securing a 1-1 even on my opponent’s Booda turn.
On T3, I led with the 1-mana Alchemist from reserve while my opponent replayed their Sun Wukong (R). I created Maw, then used the sacrifice mode on Flamel (U) to eliminate their Sun Wukong for good while winning both expeditions.
I thought I might be able to trade on the turn I got down Baba’s Isba (R) thanks to an after-you sacrifice, but my opponent played two copies of Helping Hand (R), one on each of their characters to 2-0 my Maw and Yzmir Stargazer (R).
My opponent’s Shenlong (R) turn guaranteed a 1-1 since there was no Boom! (F) in sight, but it gave me the freedom to draw up with Gift of Self (C).
I sabotaged their Shenlong with a Tooth Fairy (C) since it’s one of the characters that can actually stonewall Maw. Their Atlas (C) was a real problem for me, however. Suddenly, the best my spell-heavy hand could do was go 1-1, so I tried to do so in the most resource-positive way possible: Off You Go! (C) on a 3-drop and the 2-mana Moonlight Jellyfish (U-1814) for a 4/4/4 Maw and two draws, one of which put Small Step, Giant Leap (C) into reserve to give Atlas fleeting.
Passing priority into a Kraken’s Wrath (R) let me clean up the board to get within one expedition of victory. It would have been a 2-0 were it not for my opponent’s Intimidation (C) on Maw, but with Small Step in reserve, I figured it was close enough. On my opponent’s next turn, however, they top-decked their third and final Haven Bouncer (C) as the first player to sabotage my Small Step insta-win. They followed it up with another Atlas (R) I couldn’t remove, taking us to tiebreakers.
By my final turn, all I had in hand were small characters. I played out my third Baba’s Isba (R) primarily for card draw and managed to find the Ordis Cadets (F). I played out all my small characters, waited until my opponent was tapped out to create Maw, then sacrificed them one by one to each of the three Isbas, growing Maw to a 6/6/6. With Flamel (C) from reserve and an Off You Go! (C), it was enough to be narrowly ahead in forest and water to win the game in tiebreakers.
Round 2 (W): Teija & Nauraa
As the first player, I kept a Baba’s Isba (R) and Studious Disciple (C), figuring they would let me 1-1 against any start I could think of except for Spindle Harvesters (C). Sure enough, I dropped the Isba, my opponent played a Sneezer Shroom (R), I played the Disciple diagonal to it, and my opponent’s Muna Caregiver (C) didn’t impact the board on either side.
Maw costing 1 mana as the second player prohibited strong plays with Gift of Self (C) or the 2-mana Moonlight Jellyfish (U-1814), but Alice (F) again put in work, letting me win in water against the 3/3/3 Sneezer Shroom (R). My opponent let their Sneezer Shroom go to reserve, saving their Caregiver anchor for their Dracaena (R).
On my Maw turn, I replayed the Studious Disciple then used the 2-mana Moonlight Jellyfish (U-1814) to draw and boost Maw. This time, I also made use of the from-hand ability by putting a Gift of Self (C) into reserve to give my opponent’s Dracaena (R) fleeting. If my opponent held back, I could afford to Gift of Self for a 4/4/4 Maw, but they fought hard, forcing me to replay the Moonlight Jellyfish (U-1814) and Isba-sacrifice the Disciple to make Maw a 6/6/6.
My opponent made a big push with a Yong-Su, Verdant Weaver (C) on the following turn while anchoring the Dracaena for a potential fourth turn on board. I had the Off You Go! (C) for it, though, which let me win the expedition with a 1-drop while drawing with Gift of Self (C).
Thanks to getting as much card draw as possible while trading through the early turns, I had access to all the removal I needed. Both copies of Boom! (F) wreaked havoc on board now that I had the mana and disposable characters to make use of it. Those alongside a recycled Off You Go! (C) with Flamel (C) let me 2-0 on the following turns to close out the game.
Round 3 (W): Afanas & Senka
I played a Baba’s Isba (R) as the first player again. My opponent played a Kadigiran Mage-Dancer (R) companion-side. I played a Studious Disciple (C) hero-side.
My opponent’s placement put them into a predicament. If they committed more to the Mage-Dancer, I could pass and still trade. They didn’t, so I created Maw, sacrificed the Disciple to the Isba, and my 2/2/2 Maw 1-0’d them. I went down on resources, but I was happy to do so since it meant an early expedition lead against Afanas.
On T2, my opponent led with a Sneezer Shroom (F). With a 3-mana Kadigiran Alchemist (C) in hand, I after-you’d for 1 mana by creating and sacrificing Maw. They replayed the Mage-Dancer, leaving 1 mana up. I played the Alchemist against the Sneezer Shroom; it beats a single-boosted Shroom, and if they had Helping Hand (F), they’d have to target the Shroom, forgoing the card draw and losing fleeting on the Mage-Dancer.
They did have the Helping Hand (F) and opted to give the three boosts to the Mage-Dancer to draw, trading expeditions.
I replayed the Kadigiran Alchemist and played Flamel (U) to flash a spell into reserve then back to hand, forcing a sacrifice on one of their two Sneezer Shroom (F)s. They replayed the Mage-Dancer and Helping Hand combo, but Flamel (U) was able to win its side thanks to the sacrifice.
I had the Off You Go! (C) ready for the Mage-Dancer the second it left reserve. I played the 1-mana Moonlight Jellyfish (U-27) to return Off You Go! to hand while boosting Maw, but once I went below 2 mana, they reanchored their multi-boosted Sneezer Shroom, then slept Maw for a tempo double-progression.
They had the second Mage-Dancer, but a Boom! (F) for it kept them low on cards going into the late-game while boosting both of my Maws, letting me easily 2-0.
My opponent wisely sabotaged my Flamel (U) and Off You Go! (C) to prevent me from removing their boost targets, but I had drawn into my one copy of Beauty Sleep (F), letting me sleep a character in each expedition and win with a 2/2/2 Maw and a Studious Disciple (C).
